
Chat on WhatsApp
+1 (617) 987-7432
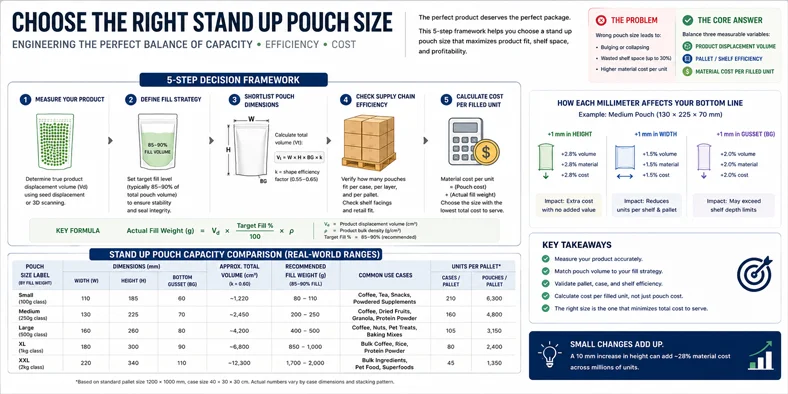
You’ve formulated the perfect product—artisanal coffee, freeze-dried fruits, or probiotic powder. But when you test the first prototype stand up pouch, it either bulges awkwardly, wastes 30% of shelf space, or collapses under its own weight. The core answer: Choosing the correct stand up pouch size requires balancing three measurable variables—product displacement volume, pallet/shelf efficiency, and material cost per filled unit. This guide walks you through a 5-step decision framework, includes a comparison table of real-world capacity ranges, and quantifies how each millimeter of dimension affects your bottom line. No sales pitch, just engineering logic.
Bottom gusset – the folded inward panel that expands when filled. A wider gusset (e.g., 40mm vs 30mm) increases standing stability by ~20% but adds 8–12% more film material. Business impact: For heavy products like 1kg pet treats, a wider gusset prevents tipping on shelves; for lightweight snacks, it’s unnecessary cost.
Most pouches lose 15–25mm at the top for sealing. A 200mm tall pouch may only offer 175mm internal height. Business impact: Underestimating this leads to underfilling or resealing failures. Always add 20mm to your required fill height.
Explore packaging solutions for high-moisture products →
The table below quantifies typical ranges for stand up pouches. Use these as benchmarks, not absolute rules.
| Comparison Dimension | Small / Single-serve (50–200g) | Large / Family or Bulk (500–1500g) | Application Guidance |
|---|---|---|---|
| Typical volume range (cm³) | 150 – 500 cm³ | 800 – 2500 cm³ | Snacks, spices vs. flour, pet food |
| Bottom gusset width | 25 – 35 mm | 40 – 70 mm | Wider gusset = higher material cost (+8-12%) but better display stability |
| Fill speed impact (bags/min on rotary filler) | Up to 70 bags/min | 40 – 50 bags/min | Business value: Small pouches increase hourly output by 40% – critical for contract packers. |
| Material cost as % of total package | 12 – 18% | 22 – 30% | Larger pouches use heavier films (more plies) – trade-off with freight efficiency. |
| Pallet density (units per euro pallet) | 8,000 – 12,000 | 1,500 – 3,000 | Small sizes reduce shipping cost per unit but increase handling time. |
Quantified insight: Increasing bottom gusset by 10mm raises material consumption by ~0.8g per pouch (for a 200×300mm lay-flat size). For 1 million units, that’s 800kg of extra laminate – equivalent to ~$2,400 in film cost at $3/kg. Use the narrowest gusset that still passes drop tests.
Follow these steps to determine your exact size specification – no guessing.
View standard dimension series for dry food & snacks →
Density: 0.42 g/cm³. Required volume = 340/0.42 = 810 cm³. Headspace for CO₂: add 10% → 891 cm³. Choose width 140mm, height 220mm, gusset 50mm → volume = (140×220×50)/2 = 770,000 mm³ (770 cm³) – slightly low. Increase height to 240mm → 840 cm³ perfect. Top 3 criteria: degassing valve compatibility > oxygen barrier > size consistency with retail shelf (fits Starbucks bag footprint).
Very low density: 0.12 g/cm³. Volume needed = 200/0.12 = 1667 cm³. Wide gusset critical (70mm) to prevent bulging. Dimensions: width 200mm, height 280mm, gusset 70mm → volume = (200×280×70)/2 = 1,960,000 mm³ → ample. Top 3 criteria: puncture resistance (sharp edges) > resealable zipper > large printable area for nutrition facts.
Similar needs? See our industry page for freeze-dried products.
Q1: What is the minimum order quantity for custom-sized stand up pouches? MOQs vary by supplier and whether custom printing or plain stock. For plain pre-made pouches with standard sizes, you can find as low as 500-1000 units. For fully custom dimensions with rotogravure printing, typical MOQs range from 10,000 to 50,000 pieces. Always ask for “stock size” first if you need low volume.
Q2: How do I measure a stand up pouch’s dimensions correctly? Measure three values: lay-flat width (side to side), lay-flat height (top seal to bottom edge), and bottom gusset width (folded inward). Never measure the filled pouch because film stretches. Use a rigid ruler on an empty, flat pouch.
Q3: Can I use one pouch size for multiple product weights? Yes, but only within a range. A 1-liter volume pouch can fit 200g of low-density cereal (5x expansion) or 800g of high-density powder. However, headspace may cause oxygen damage for sensitive products. Best practice: each SKU gets its own size calculated via density method.
Q4: What are the standard stand up pouch sizes available without mold fees? Common stock sizes (in mm): 120×180×35, 140×200×40, 160×240×50, 180×280×65, 200×300×75. These cover most dry foods from 100g to 1000g. No tooling charges, lead times 2-4 weeks.
Q5: How does pouch size affect shipping costs? Larger pouches increase dimensional weight (DIM weight). For air freight, a 200×300×75mm pouch has DIM weight ~1.2kg, while a 140×200×40mm is ~0.4kg – triple the cost per unit. Always optimize for case pack efficiency.
Q6: Does stand up pouch size influence seal strength? Indirectly. Larger pouches require longer seal bars; inconsistent heat distribution across a 350mm seal can weaken edges. For pouches over 250mm width, request servo-driven sealers with temperature profiling.
Selecting the right stand up pouch size boils down to three core metrics: product density → required volume → shelf/freight efficiency. Always add 15% margin for headspace, validate with your filling machine’s jaw width, and run a material cost vs. freight trade-off. For most B2B buyers, starting with a stock size that matches 80% of your volume is smarter than immediate custom tooling.
This article is for informational and educational purposes. All technical discussions and decision frameworks are provided to help you make informed purchasing decisions. No direct sales or pricing information is included. — PACKEXPERT
Chat on WhatsApp
+1 (617) 987-7432